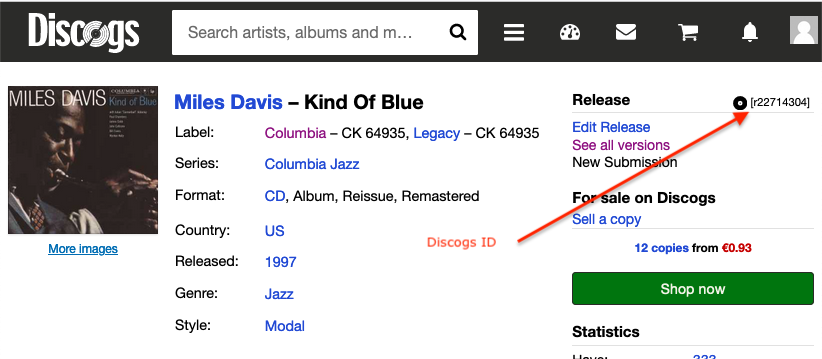
Beyond Category (BC) can import albums from Discogs.com via the Import Discogs window. Select this window from the File->Import->Import Discogs menu item. To use this window, you must first know the Discogs.com id for the album to be imported. To find this, look up the album to be imported from the Discogs.com website. The release id will generally be found in the upper right corner of the page for a release. Releases are prefaced with an “r”. Don’t confuse master release records with individual release records. Masters are prefaced with an “m” and as they are a record of several similar releases, they are not suitable for import. Below is an example of where to find the Discogs id for the Miles Davis album, Kind of Blue.
Retrieving the Discogs Data
Use the File->Import->Import Discogs.com Album menu to ppen the Get Import File window (shown below) to request a JSON file for import.

You can import Discogs data directly from Discogs.com by entering the Discogs id in the Discogs Release Id field and pressing the Get Album button. Alternatively, you can grab the Discogs JSON and save it to your hard drive for editing first and then use the Get Local JSON File button to import the edited JSON. (See below for how to get and save Discogs JSON to your hard drive.)
Using either method to get the Discogs data, BC will parse the JSON into the Import Album window as shown below.

On initial load from Discogs, BC will attempt to match the import data with the songs, personnel names, instruments, and label that are already entered in BC. What is not found will be displayed in red text. It is up to the user to reconcile these unmatched data items before BC will allow the album to be loaded into the database.
It is unrealistic to expect exact matches for names and titles between Discogs and the data entered in a BC database. Discogs is a crowd sourced database and not likely to be as precise as the data a collector will enter into their own BC database
How BC Matches Data
Personnel
Discogs provides personnel names and roles played by personnel. BC stores personnel names and a skill field to help distinguish duplicate names. BC will simply match the full names of the personnel regardless of the role the person is playing. Note the names in the Collective Personnel list in the example above that are in red. BC found no match at all for those names.
Note the entry of Bill Evans in the Collective Personnel list in the example above. The name Bill Evans is in black because the name was found, but it is not a match because the BC database has two entries for the name Bill Evans: the pianist and the tenor sax player. The role played by the person is not help to us for finding a match because it may or may not match the skill field entry.
For any personnel entry in red because the name is not on the database, you will need to enter the name using the Songs/Personnel/Labels window and then use the Verify button to recheck the name and set it to black. For names that are in red because of a difference in spelling or because the name is duplicated on the database, use the Personnel lookup field located below the Collective Personnel list. Select the name in the list and then lookup the correct name on the database. Once the lookup is done, press the Update button to the right of the lookup field and all names that match will be updated. In the case of the example above with Bill Evans, you only need to select one of the entries and use the lookup field. All four entries of Bill Evans will be updated.
Any names deleted from the Collective Personnel list will also be deleted from any entry in the Track Personnel.
Song Titles
Song titles are matched by title only. Composer names do not figure in the matching. As with personnel, there may be two song entries in the database with the same title, but different composers. In this case, BC will show the title in black but mark the title as a duplicate in red.
You will also see cases like the entry of Flamenco Sketches. The master take matches, but the alternate does not because the entry in Discogs uses the words “Alternate Take” in the title to indicate such, but that means the title won’t match the entry in BC.
To reconcile the mismatches, use the Song Lookup field to indicate the correct title to Beyond Category. In the case where a title is not found on the database, use the Songs/Personnel/Labels window to add it to the database.
Labels
Labels are a straight match of the label name not including the country code. The Label field is a lookup field that you can use to select the matching name on the database. If the label name in any form is not on the database, you will need to add it to the database using the Songs/Personnel/Labels window.
Instruments
The Global Renaming of Imported Instruments panel to the right of the personnel lists is used to reconcile instrument names and remove unwanted roles from the import.
After selecting an instrument from the list, use the Role field or the popup to select the correct name for any instrument. For instance, Discogs tends to use the full word “saxophone” in their instrument names while your database may use alto sax, tenor sax, etc. Reconcile these using the Role field or the popup menu.
Another feature of this panel is to delete roles from the import. Some users want to know every person involved in creating the album while other may only be interested in roles directly related to the music. For instance, if you don’t care about notating the liner notes writer, photographer, engineer, etc. then you can delete those roles using the Ctrl-DELETE key. Doing this will also delete any personnel names using these roles from the Collective Personnel list.
Discogs uses the Composed-By tag to indicate the writers of any song. This role can always be deleted because Beyond Category does not include composers as part of the personnel.
If an imported instrument can’t be reconciled with any entry on the database, use the Instruments window to add that instrument to the database.
Miscelaneous Features
The Display JSON button can be use to display the JSON file used for the import in a separate window. This is only useful for those that understand JSON format and may want to see the raw data. There is no real need to use this to be successful with an import, but it is there for convenience for those that want to see it. The JSON Display window has a button that will allow the user to save the raw JSON to a file on the hard drive for editing. This is a feature only intended for advanced users that understand how to edit a JSON file. The edited file can be imported again using the Import feature.
Adding the Album to the BC Database
Before adding an album, it must pass verification using the Verify button. Any items needing verification must be reconciled before the Add Album button will activate.
One tricky “gotcha” is that although the Collective Personnel list verifies, there may be some track personnel with invalid instruments that need verification. You will need to click on each track entry to view the personnel for each track to find the invalid instrument and reconcile it or delete the person for that track.
Displaying the raw JSON file
Use the Display JSON button on the Import Album window to display the raw JSON file. In the case of a Discogs file, you can save it to your local hard drive for editing and re-importing. (This is not recommended if you do not understand how to edit JSON data.)
The window for the JSON display is shown below. You cannot edit the JSON using this window. You can review the entire file and/or save the JSON to your local hard drive by pressing the Save JSON File button.

When editing the JSON be sure to use a text editor and not a word processor.
|
Download
Beyond Category Macintosh Version: 8.7 
|
Download
Beyond Category Windows Version: 8.7
|